Welcome dear readers, in this article we will talk about Increase Loading Speed of WordPress Website, Increase Loading Speed of WordPress Plugin, How to Increase Loading Speed of WordPress Website
Think for yourself when you visit a website, how long do you wait for the web page to open. Just decide and move on.
According to me, not for long, am I right?
When most visitors visit a site, they only wait a few seconds for the page to open and return to Google search results.
Google uses website loading speed as a ranking factor. Faster site gets better rank in Google search results. You can read more about this on the Google Webmaster Central blog.
Here we will tell you about 4 WordPress plugins that will increase your WordPress website loading speed to a great extent. These plugins are specially designed to increase your page load speed.
Increase Loading Speed of WordPress Website with These 4 Best Plugin (With Settings)
WP Super Cache, Autoptimize and WP Disable plugins are specially designed to reduce the loading speed of WordPress website.
Jetpack provides many features that you can enable and disable individually. You can use it for design, marketing, security and speed up WordPress site loading speed.
By using these plugins, you can take your website loading speed to a new height. Just follow this tutorial.
Now let’s start their configuration. And the best part is that their configuration is very easy. You just need to check a few boxes.
1. WP Super Cache
WP Super Cache is a very popular and highly rated caching plugin in WordPress repository developed by Automattic company. If you are already using a caching plugin on your site, first disable it and install and activate WP Super Cache.
WP Super Cache creates static HTML files for your WordPress site and when a visitor requests a page, it serves static HTML files instead of heavier PHP files. As a result, it reduces your website loading speed and provides better user experience to the visitor.
After activating, click on Settings >> WP Super Cache. This will take you to the Settings page of WP Super Cache.
Here are the settings of WP Super Cache plugin,
Easy Way

Advanced Way

After completing all the settings, click on Update Status. Then you have to click on Update Mod Rewrite Rules button. As you click on it it will automatically update some code in your .htaccess file.
Here are the options which I have checked in WP Super Cache configuration,
- Enable Caching
- Expert – Mod Rewrite Rules Method (Cached Files Serves Fast)
- Don’t cache pages for known users. (Recommended)
- Compress pages so they’re served more quickly to visitors. (Recommended)
- Cache rebuild. Serve a SuperCache file to anonymous users while a new file is being generated. (Recommended)
- 304 Not Modified browser caching. Indicates when a page has not been modified since it was last requested. (Recommended)
- Mobile device support. (External plugin or theme required. See the FAQ for further details.)
- Extra homepage checks. (Very occasionally stops homepage caching) (Recommended)
2. Autoptimize
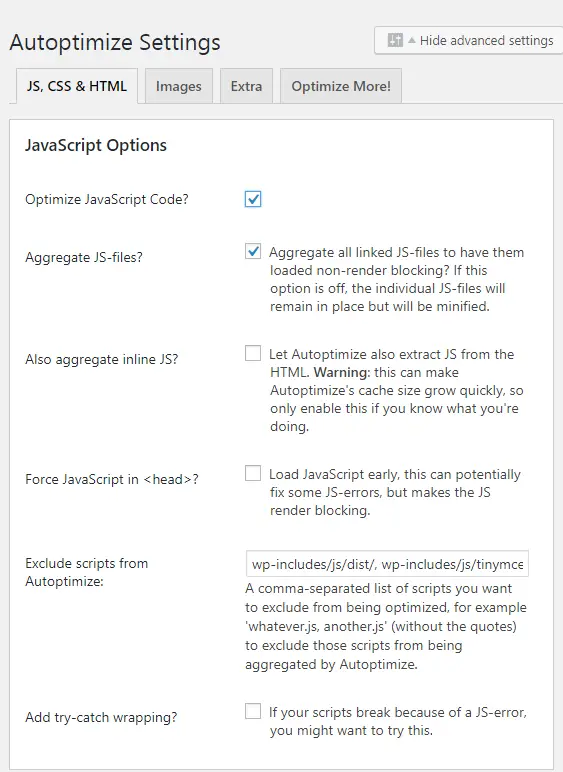
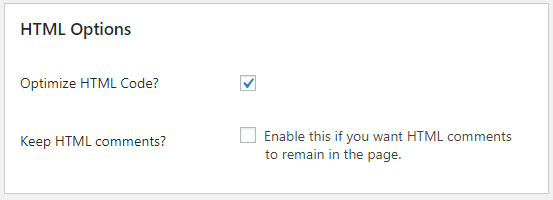
Autoptimize minifies CSS and Javascript files from your WordPress site and improves page load speed. Apart from this, it also optimizes HTML files.
After activating, click on Settings >> Autoptimize. This will take you to the setting page.
JS, CSS & HTML
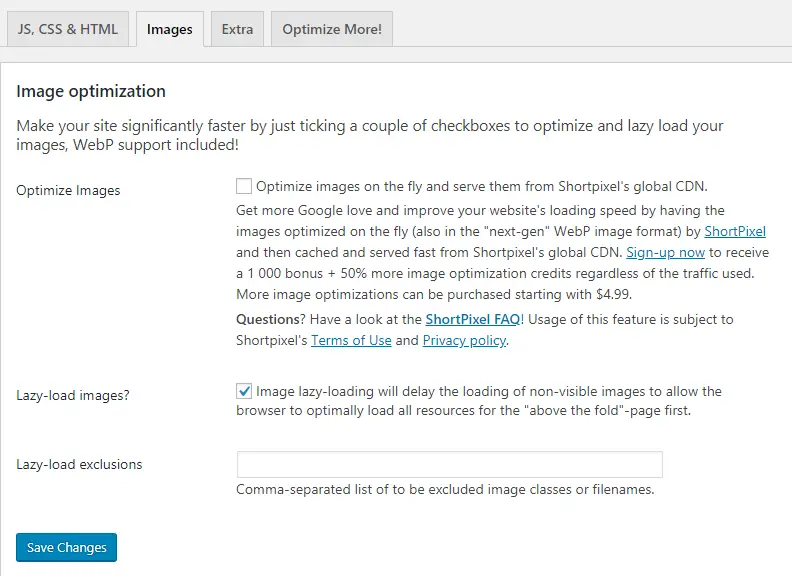
Here select all the boxes and click on Save changes button. You can see below screenshot
It sets lazy load for your images,
Extra Tab: This tab allows you to remove query strings, emojis and Google Fonts from your site.
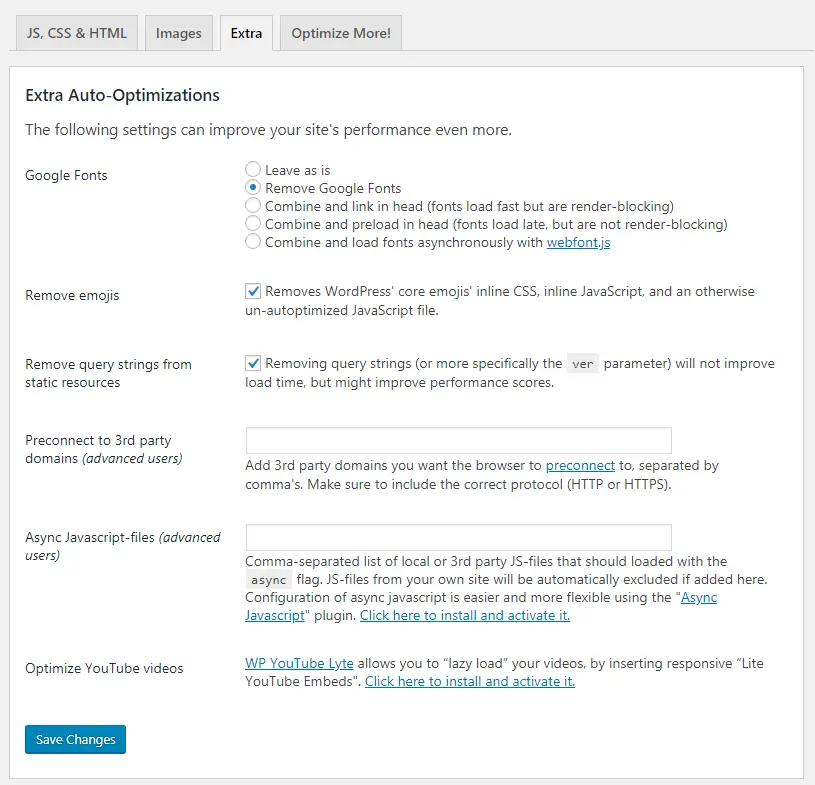
Autoptimize reduces your page size and improves website loading speed.
3. WP Disable
WP Disable is a great plugin that reduces high CPU usage by removing excess bloat from your site. In addition, you can control the Heartbeat.
Benefits of using WP Disable plugin
- Reduces HTTP requests.
- Disables Emojis, Gravatars, Embeds.
- Remove query strings from static resource
- Disables trackbacks and pingbacks.
- Can disable all comments.
- Disables XML-RPC.
- Controls Heartbeat.
- Removes the Windows Live Writer tag.
- Removes Shortlink Tag.
- Removes header from WP API.
- and many more
After activating the plugin, click on Optimization.io. This will take you to the plugin’s settings page. Here below are the settings of WP Disable Plugin,
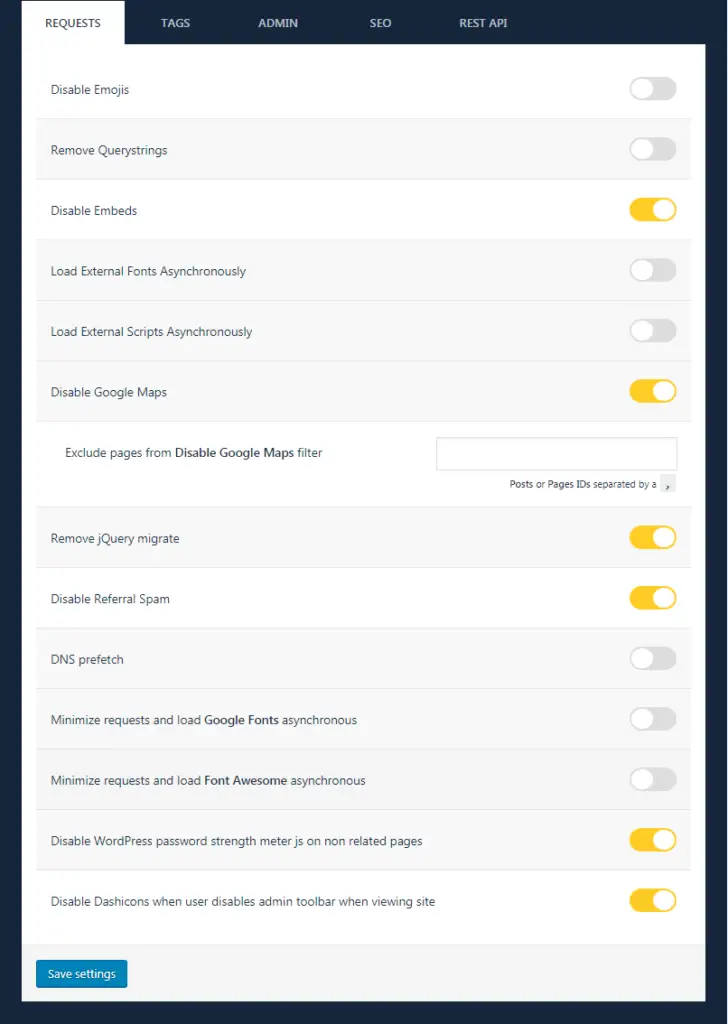
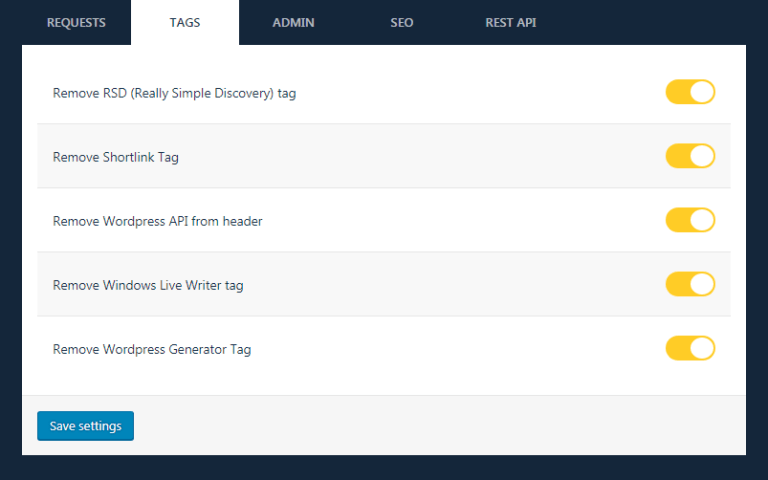


Now, this plugin removes the extra bloat from your WordPress site.
4. Jetpack
Jetpack is the best plugin that provides features like design, marketing, site speed optimization and security. And most of the WordPress users use it on their site.
To improve WordPress website loading speed, it provides global Content Delivery Network (CDN) and lazy loading for images.
Click on Jetpack >> Settings >> Writing and scroll down to the Performance & speed section. Here you will see two options, just enable them.
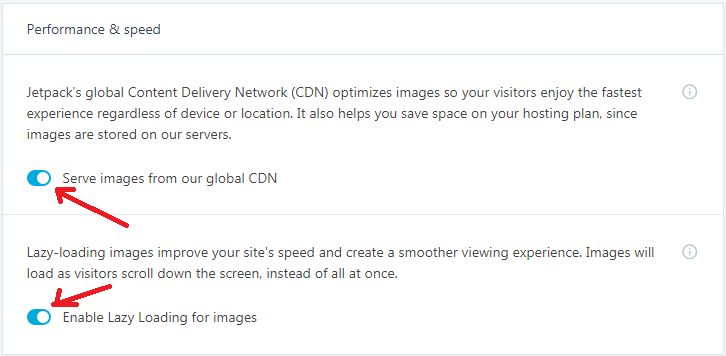
This saves your bandwidth and reduces server load.
Now you are ready to check your website loading speed. To check your website loading speed, you can use speed checker tools.
Read more article here:
- How to Get Ranked on Google Page 1 – 17 Killer Tips
- GeneratePress WordPress Theme Review 2022 – Is It REALLY Good
- YouTube New Monetization policy 2022
- What is Akismet Plugin and How to Use it?
- All in One SEO Pack vs Yoast SEO – Campare 2022
Conclusion
All these plugins are very popular and highly rated in WordPress.org. Most WordPress users use them on their sites. Plugins are mainly designed to reduce the loading time of WordPress site.
If you setup these plugins properly on your site which I have shown, it will greatly reduce your page size and improve WordPress website loading speed.
Apart from this, Google prefers fast loading sites and provides better rank in search results.

