Hello friends, let’s learn today in this post WP Fastest Cache Settings, WP Fastest Cache Plugin Settings, WP Fastest Cache Setup, Improve WordPress Site Speed
Today in this article I will share with you Best WP Fastest Cache Settings, which will help in improving the loading time of your site.
WP Fastest Cache is a very popular WordPress caching plugin. It takes your site loading speed to a new level.
WP Fastest Cache is one of many plugins for WordPress designed to accelerate your website performance. It aims to optimize page load times by creating and storing a static copy of your posts and pages, while reducing the number of database queries required to render your site and the associated server load.
When optimizing your site, you should remember that the benefits of caching may vary depending on the theme you are using and the number of plugins you have installed. However, most sites should see some benefit from caching.
WP Fastest Cache Settings
The settings of WP Fastest Cache are very easy and you can easily configure it with few clicks.
First of all install and activate WP Fastest Cache plugin on your site. Once the plugin is activated, it will add a new menu item to your WordPress dashboard with WP Fastest Cache.
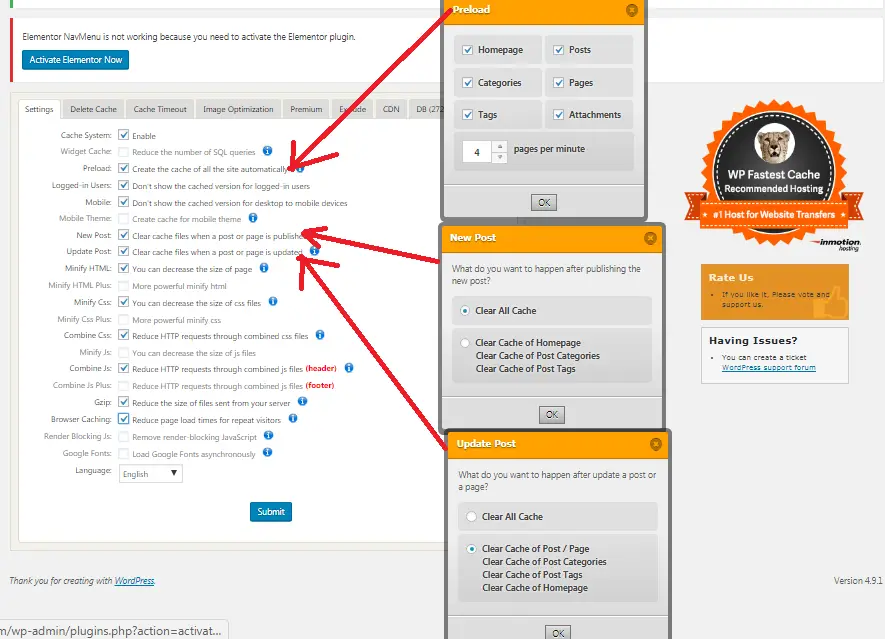
While configuring WP Fastest Cache, you only need to make changes in the Preload section. If you use Shared hosting, then you have to set 4-6 pages per minute and for VPS 10-12 pages per minute.
Follow the below screenshot for WP Fastest Cache settings,

Follow the Quick Steps:
- Cache System – Enable.
- Preload – Enable the option and check all the options (Homepage, post, categories, tags etc.) in the popup. But keep one thing in mind if you are using Shared hosting, then set it to 4-6 pages per minute and for VPS 10-12 pages per minute.
- Logged-in Users – If you are running Single Author website, keep cached enabled and if you are running Multi-author website, keep cached disabled.
- Mobile – Enable.
- Mobile Theme – This is a premium feature.
- New Post – Enable it and select “Clear all Cache” in the popup box and click on OK.
- Update Post – Enable the option and select “Clear cache of post/page” and click on OK button.
- Minify HTML – To decrease your web page size, enable it, it will also improve your site performance.
- Minify HTML Plus – This is a premium feature.
- Minify CSS – It decreases the CSS file from your site and improves your site performance and loading speed.
- Minify CSS Plus – is a premium feature.
- Combine CSS – It reduces HTTP requests by combining JavaScript and CSS files.
- Minify Js – Reduces Js file size.
- Combine Js – Reduces HTTP requests by combining js files.
- Combine Js Plus – is a premium feature.
- Gzip – Compresses your webpage size.
- Browser Caching – Reduces page load times for visitors to your site again.
- Render Blocking Js – Premium Feature.
Let’s learn more article:
- What is Blogging – How to Start Blogging? Guide 2022
- What is Technical SEO? Technical SEO Checklist 2022
- Increase Loading Speed of WordPress Website with These 4 Best Plugin (With Settings)
- 5 Websites to Hire Best WordPress Developer
- How to Make a WordPress Website Mobile-Friendly
After that leave the rest of the settings as default. If you want to enjoy its premium features, then you can upgrade to it.

