Welcome to AiTechtonic, let’s know How to Use WebP Images in WordPress, WebP image wordpress plugin, use WebP images in wordpress
Do you want to use WebP images in WordPress? WebP is a modern image format that provides better image compression by reducing the file size. This makes your website load fast and also saves bandwidth. Today in this article, I will show you how to easily use WebP images in WordPress and convert old images to WebP.
What is WebP and Why Use WebP Images in WordPress?
WebP is a new file format for images. Using this image format, you can reduce the file size by 25-34% compared to PNG and JPEG without losing your image quality.
If images are slowing down your website, converting them to WebP format can improve your page load speed score.
Since WebP is a newer file format, it is not yet supported by all browsers. However, most modern browsers such as Google Chrome, Firefox, and Microsoft Edge support WebP images.
Should You Use WebP Images in WordPress?
WebP images can help you speed up your WordPress website. Since WordPress 5.8, WordPress has started supporting WebP images by default. This means that you can upload WebP images to your WordPress site without using a plugin.
If you use a lot of images on your site, and they are slowing down your WordPress blog, then you should definitely consider using WebP images.
Here’s how to use WebP images in WordPress.
How to Use WebP Images in WordPress with the EWWW Image Optimizer Plugin
The EWWW Image Optimizer plugin is one of the best WordPress image compression plugins that allows you to optimize your WordPress images. It also converts the uploaded images on your site to WebP format.
First of all install and activate EWWW Image Optimizer plugin in your site. After activating the plugin, click on Settings >> EWWW Image Optimizer. You’ll be greeted by a setup wizard, but you click the I know what I’m doing link to exit the wizard.
In the next page you will see many options. Scroll down and check the box next to WebP Conversion and click on the Save Changes button.

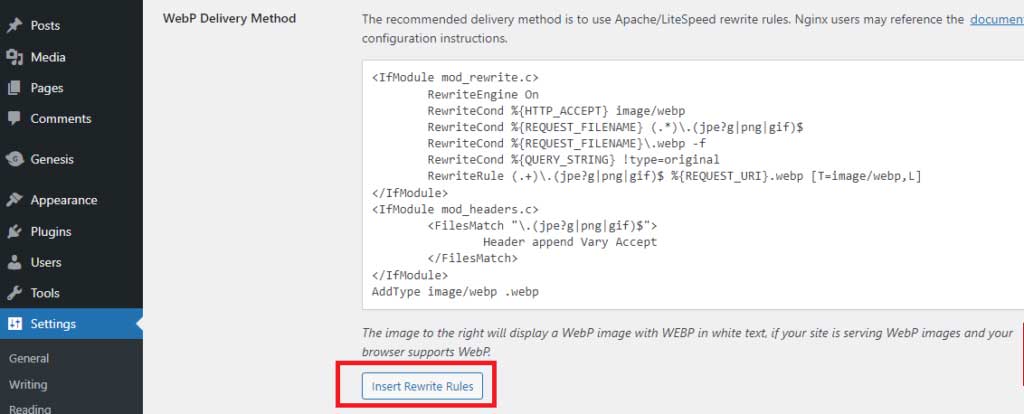
Next, you have to scroll down again to the WebP Conversion section. The plugin will now show you the rewrite rules. And the WebP text will appear in red.
You need to click on the Insert Rewrite Rules button, and the plugin will automatically insert these codes into your .htaccess file. After this you will see WebP text in green color.

Sometimes, the plugin is unable to add this Insert Rewrite Rules code to the .htaccess. In that case, you will need to copy the Rewrite rules from the plugin’s settings page and paste them below in your .htaccess file.
After you’re done, come back to the plugin’s settings page and click on the Save changes button. If WebP turns green, it means that you have successfully enabled WebP image delivery on your WordPress site.
Apart from this, you can choose JS WebP Rewriting or <picture> WebP Rewriting option for WebP image delivery. These are a little slower than the .htaccess method, but they do the job perfect.
How to convert your old image to WebP image
EWWW Image Optimizer allows you to easily convert your already uploaded image files to WebP images. Just click on Media >> Library and switch to list view.
If you have a lot of images on your site, click Screen Option and change the Number of items per page to 999. If you have 1000+ images, those images will appear in the next page.

This way you will be able to quickly optimize a large number of images by selecting them for bulk optimization. Click on Select All to select the image. After this select Bulk Optimize option from the drop down menu and click on Apply.
On the next page the plugin will give you the option to skip the image compression and just convert them to WebP. You can check this option if your images are already optimized.

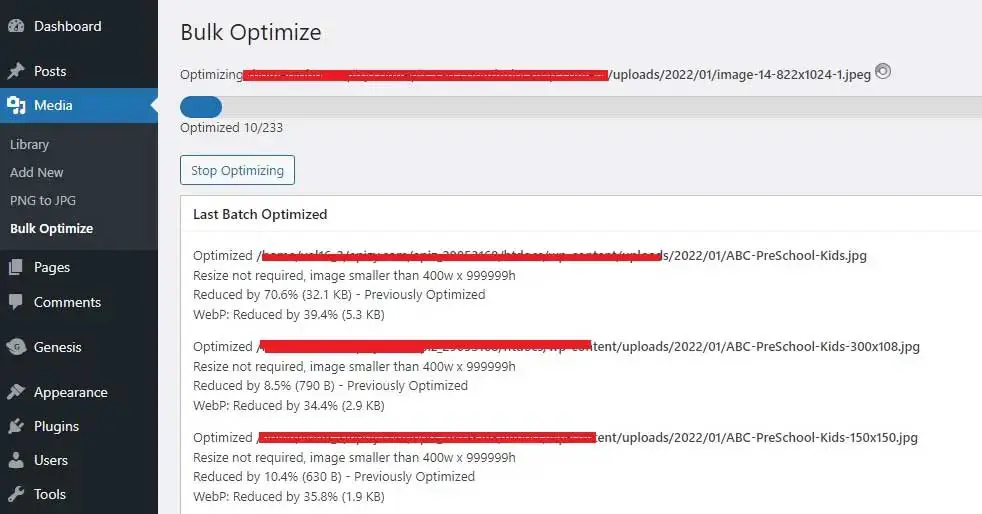
After that, click on the Scan for Unoptimized Images button to continue. The plugin will show you the number of images, all you have to do is click on the Optimize button.
Now it will start optimizing your image and convert your image to WebP format.

How to check if your image is in WebP
When you’ve optimized your image, go to one of your blog posts or pages with images. To open the image in a new tab, right-click on the image and click on the Open Image in a New Tab option.
This will open your image in a new browser tab, and you should be able to see that the address bar has a .webp extension.
If the plugin does not serve WebP images, then you can go to the settings page of the plugin and from here you can change the WebP delivery option to ‘JS WebP Rewriting’ or ‘<picture> WebP Rewriting’.
Read more article:
- Top 10 High CPC Adsense Niches and Keywords in 2023
- How to earn money from blogging in 2023? 10 Best Ways
- What is Google Adsense Auto Ads – How to Work, Enable?
- What is Blogging – How to Start Blogging? Guide 2023
- What is Technical SEO? Technical SEO Checklist 2023
In this article, I told you how to use WebP images in WordPress and how to convert old, uploaded images to WebP. A small request If this article has proved to be helpful for you, then do not forget to share it.

